
Welcome to the DESIGNER CRAFTS CONNECTION Blog Hop for the month of April. This month’s theme is April Showers Bring May Flowers. I had so many different possible flower projects in mind that it was hard to choose just one. But I love Iceland Poppies so I made a giant bouquet to celebrate Spring.

I love how Iceland Poppies look so fragile yet burst with candy-like colors. So I made giant Poppies using tissue paper and Large Poppy Die Set by Brenda Walton. Each flower is about 6 inches across so they make a beautiful, showy display just like real Iceland Poppies only larger.

- To begin, I tried to find crepe paper sheets but most were too expensive for my thrifty budget so I had to improvise. I found the most perfect colors available as tissue paper by Hallmark. I found these at Walmart in the gift wrap section for about $1 each. Each package contains eight sheets and each sheet makes about two poppies.
- I die cut petal from each color of tissue paper except for green which I used to cut the leaves. I die cut the stamen {center comb-like shape} out of yellow card stock because I wanted it to be more stiff. The die also cuts a little round shape to use for the base of the flower but I didn’t use it with my technique.
- After a little experimenting, I decided that I wanted to add a piece of wire to the center of the flower as a means of attaching it to something later. I rummaged through my vintage button collection and pulled out small metal buttons, about 1/2 inch across. I looped about 12 inches of a medium gauge wire onto the button as shown leaving two equal ends to hold onto.
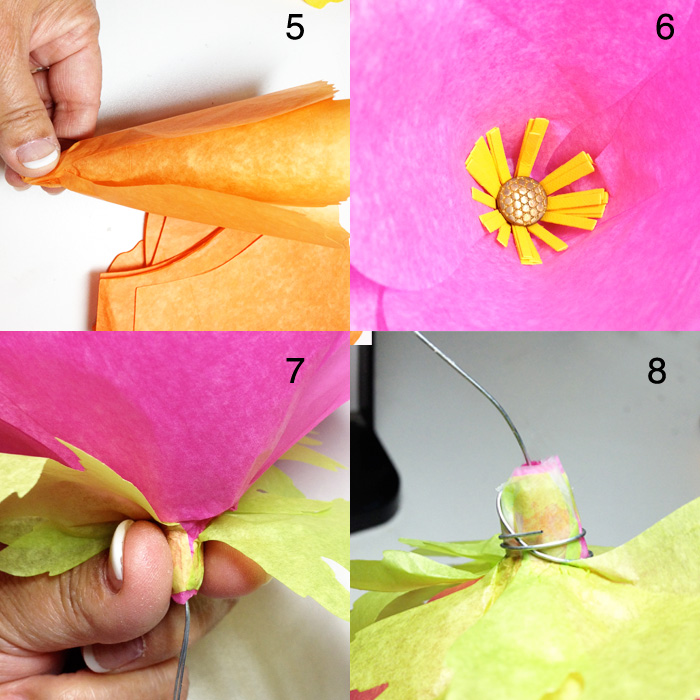
- I rolled the yellow stamen around the wire.
 I started wrapping individual petals around the stamen. I began with one petal on one side and wrapped the next petal on the opposite side. The third petal was started at 90 degrees on one side and then opposite on the other side. I continued wrapping petals in varying locations around the center until I wrapped a minimum of 16 petals.
- Once the petals were wrapped and while I was holding the base of the petals snugly, I pulled the button wire down which made the center stamen open outwards.
- I used a tiny bit of quick-drying glue to hold the petals together at the base then glued on four green leaves.
- The last step was to secure the wire by taking one end of the wire and wrapping it tightly around the base. If desired, you can add some green florist tape to finish this off and make it look prettier. This is also where you could attach the green circular piece that is included in the die cut.
To add a little more realism to these flowers, gently scrunch the tissue paper petals as a final touch. I scrunched the inner petals towards the center and just generally scrunched the outer petals for texture. Amazing how this last touch makes them look real.

These poppies can quickly make a large home decor display. Here I am standing next to them to show scale. Hope you enjoy this project. Please visit all of the amazing April Showers Bring May Flowers projects by visiting the DESIGNER CRAFTS CONNECTION website. And please Like me on Facebook and Instagram.
PRODUCT LINK
Sizzix Large Poppy Die Set

Thrilled to be Featured at:
Create-With-Joy


This is Linked to:
Adventures of Mel, Cozy Little House, Create With Joy, Creating My Way to Success, Cupcakes and Crinoline, Denise Designed, Designer Crafts Connection, DIY Showoff, Flamingo Toes, Funky Polka Dot Giraffe, Ginger Snap Crafts, Homework, Intelligent Domestications, Kathe With an E, Keeping It Simple Crafts, Lamberts Lately, Life on Lakeshore Drive, Live Laugh Rowe, Live Randomly Simple, Lou Lou Girls, Mad in Crafts, Mommy On Demand, My Uncommon Slice of Suburbia, Nifty Thrifty Things, Posed Perfection, Recreated Designs, Sarah Celebrates, Scrapality, The Crafty Blog Stalker, The DIY Dreamer, The Girl Creative, The Happy Housie, The Melrose Family and USS Crafty


Leave a comment