
How to Start with a hand-drawn image, print it on fabric with an inkjet printer and stitch a hand-embroidered patch

Skill:
Easy
Category:
Embroidery
Another Easy Way to Create a Hand-Stitched Patch By Printing Directly Onto Fabric With an Inkjet Printer
👋 Hi friends, and welcome back to my creative textile art space!
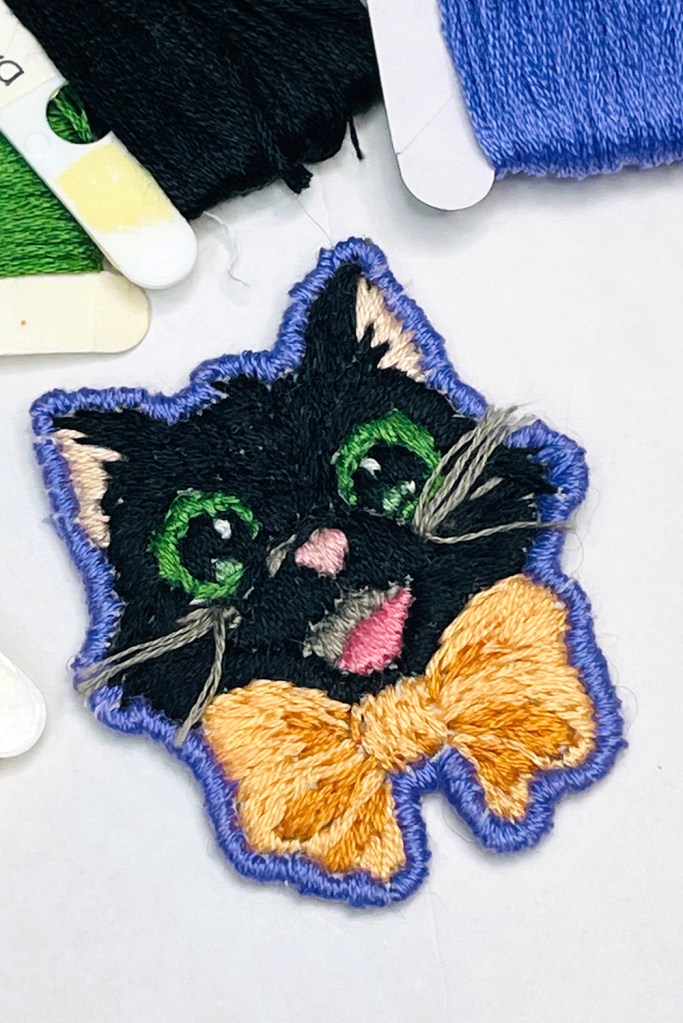
In today’s video—and this blog post—I’m sharing Part 2 of a special Halloween-themed hand-embroidery project where I take my hand-drawn illustration of a whimsical black cat and transform it into a hand-embroidered Halloween patch.
If you haven’t seen Part 1 yet, that’s where I walk you through the drawing and fabric transfer process—so be sure to check that out first! Check it out below.
🎃 Step 1: From Hand-Drawing to Fabric
After creating my original Halloween cat sketch, I used a simple inkjet printer and freezer paper to print the design directly onto fabric. This method is one of my favorite ways to blend illustration with embroidery. It’s low-cost, beginner-friendly, and perfect for working with thrifted or upcycled textiles.
🧵 Step 2: Choosing Fibers & Threads
I love the tactile experience of working with secondhand and vintage fabrics. For this piece, I chose a soft, tightly woven cotton blend fabric and selected floss from my stash of reclaimed embroidery floss. This not only supports sustainable making, but also gives the project a warm, layered look.
✨ Step 3: The Stitching Process
With the image transferred and fibers selected, I began stitching. Using a mix of basic embroidery stitches—like satin stitch and whip stitching—I let the image guide me. I focused on building texture and personality into the cat design while letting the imperfections of hand stitching add charm and uniqueness. I even introduced a fun stitch called the Turkey Stitch or Turkey Work Stitch. It is called “Turkey” because it is similar to the stitch used to make Turkish rugs.
This kind of slow, mindful stitching is such a grounding process. It’s not about perfection—it’s about presence, creativity, and honoring your materials.
🎨 Step 4: Creating the Patch
Once the embroidery was finished, I trimmed the fabric and whip stitched around the edges to create a sturdy, handmade patch. You can sew it onto a jacket, bag, or use it as part of a Halloween art quilt. The possibilities for customized textile patches are endless!
🌿 Final Thoughts
This project is a beautiful example of mixed media fabric art—blending illustration, sewing, embroidery, and sustainable craft practices. It’s perfect for anyone looking to create one-of-a-kind, hand-sewn Halloween decor or personal wearable art using simple, creative stitchery.
Thanks for watching and stitching along with me. If you enjoyed this project, don’t forget to like, comment, and subscribe for more videos on textile art, slow stitching, embroidery tutorials, and mindful sewing using thrifted materials.
See you in the next video, and happy stitching! 🧵🎃✨
TOOLS
- Reynolds Freezer Paper
- Inkjet printer
- Iron
- Needle
MATERIALS
- Fabrics: tight weave cotton in a light color
- Felt for backing
- DMC Floss: 155, 310, 646, 754, 922, 962, 987, 3825


Turkey Work Stitch
I used 3 strands of floss and just did one Turkey Work Stitch to create each side whisker. This stitch can be repeated with loops of floss and trimmed to create large areas of texture if desired.

Whip Stitch


Leave a comment