Welcome to the #sizzixeclips Blog Hop. This blog hop is near and dear to my heart and I had so much fun creating an applique project using my Fox design available in the eShape store. At the bottom of this post will be instructions on how you can enter for a chance to win a free gift certificate {this contest has ended} plus I am also giving away a free SVG tea cup file {this give away is ongoing so please read below}. Enjoy!
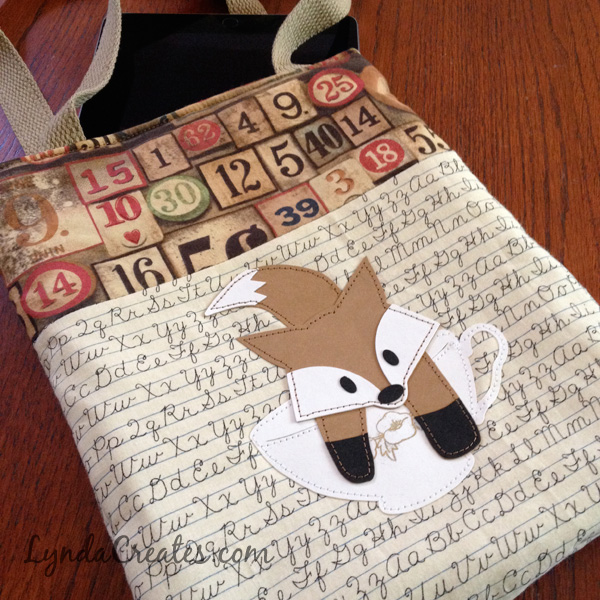
For this eClips project I used my Fox design plus I designed a tea cup for her to sit inside. The bag is made from Tim Holtz fabric. Other supplies used include about 1 1/2 yards of strapping, batting and either fabric or Sizzix Paper Leather for the shapes.
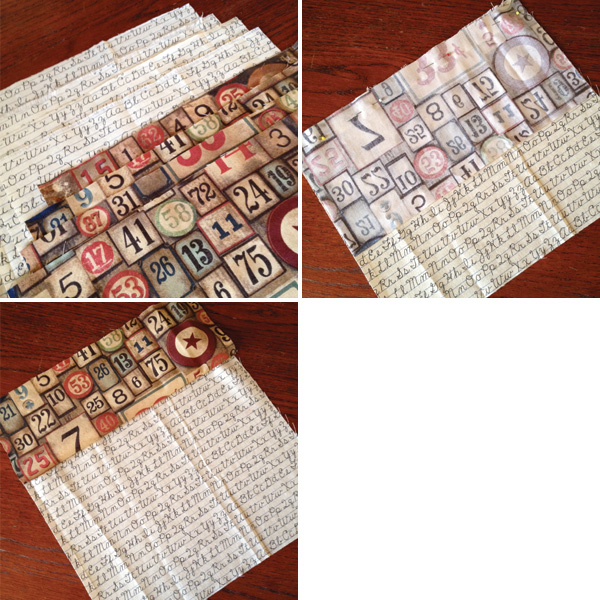
You can vary the size of the bag depending on your preferences. I used two contrasting fabrics. As a loose rule, I cut the top fabric about half as tall as the bottom fabric. For my bag I cut the width of each piece to 11 inches. The top fabric was cut to 5 inches tall. The bottom fabric was cut to 9 inches tall. This allowed for a 1/2 inch seam. I cut four of each piece, two for the lining and two for the outside. I stitched the bottom of the dark fabric to the top of the light fabric then ironed them flat. Note, if your fabric has a direction pattern, make sure everything faces the same direction after it is opened flat.
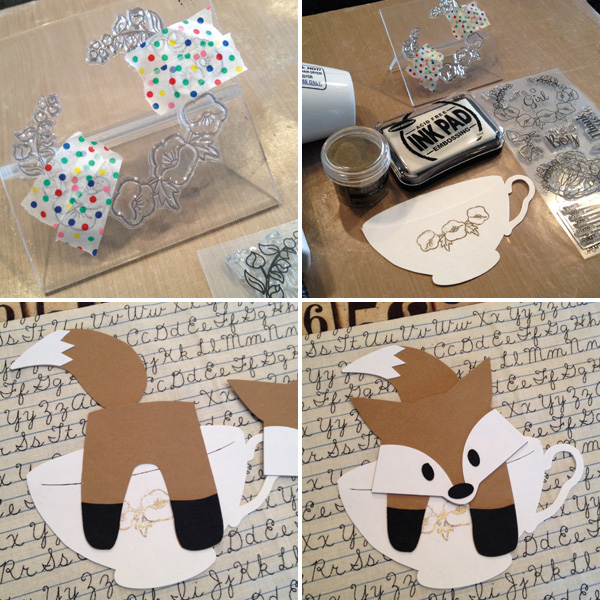
I used the Sizzix eClips to cut out the Fox and tea cup. The width of the Fox face is 3 1/4 inch wide as a reference. I cut everything out of Sizzix Paper Leather because A} I had some available, B} I don’t have a fabric cutting mat for my eClips and C} I know you can sew Paper Leather so it would work for this project. I wanted to add a little sparkle to the tea cup so I used my Sweet Baby clear stamps, masked off the parts that I didn’t want to stamp, inked it with embossing ink and gold embossed the flowers.
Because my little Fox is sitting inside the tea cup, I cut the body shape down as shown. I cut an extra body piece out of black Paper Leather and trimmed it to make the black paws. I arranged all of the shapes to make sure everything fit on the front of the bag. I used a bit of adhesive to glue the paws, mask, eyes, nose and tail to the shapes below. This will keep them in place while you sew.
What I forgot to show here is that I cut two pieces of batting to the same size as the bag shape. I pinned them to the wrong side of the bag front before stitching the Paper Leather shapes. The batting added extra support when stitching.
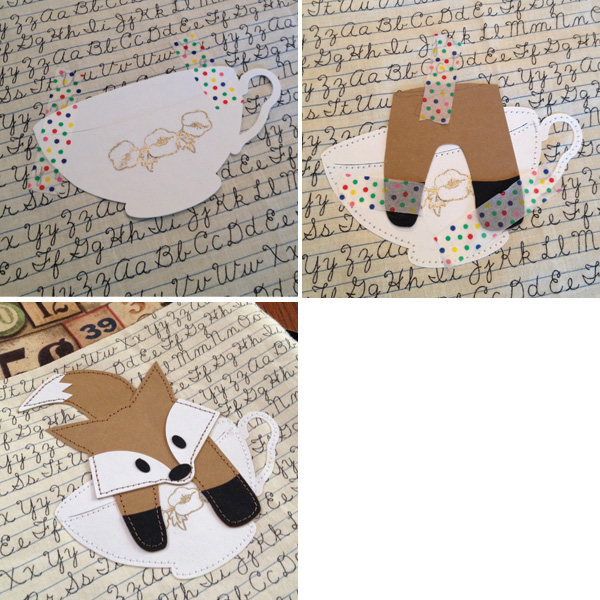
I used Washi tape to hold the shapes in place as I sewed them. I started sewing the shape that was furthest back, the tea cup. I carefully machine stitched around the tea cup then added the body and stitched that. I stitched the tail and finally the head.
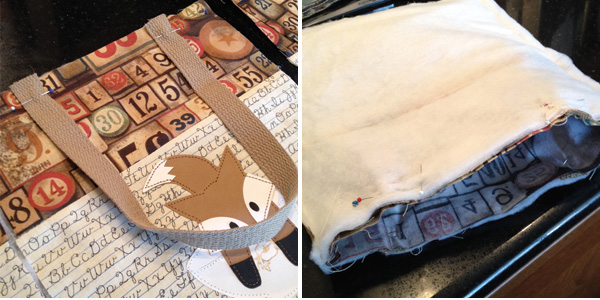
To finish the bag, cut two pieces of strapping to 21 inches long and pin them to the right side of the outside bag as shown. Pin the second strap to the other outside bag piece. Beginning with the two inside fabric panels, stitch them right-side together on three sides using a 1/2 inch seam leaving the top open. Repeat on the two outside padded fabric panels stitching the right-sides together {so you are stitching on the batting} using a 3/8 inch seam.
You now have two “bag” shapes. There is a bag with padding and a bag without padding. Starting with the bag WITHOUT padding, turn it right-side out and set aside. Turn the bag WITH padding so that the padding/batting is facing out.
Take the bag WITHOUT padding and place it inside the bag WITH padding. Make sure that the straps are in between the two bags and the strap ends are pinned at the open top. Pin around the top of the two bags leaving an opening between two of the straps to allow you to turn the bag later.
Stitch a 1/2 inch seam around the top of the two bags leaving the opening to turn. If you used Paper Leather for your Fox then pull that through first when turning the bag right-side-out. After turning the bags right-side-out, pin along the top making sure to secure the straps in place. Top stitch around the top of the bag to close and finish.
My bag turned out to be the perfect size for a tablet or for books.
Thank you for reading all the way through and for joining us in this #sizzixeclips blog hop. Please read a little further for two free opportunities.
For your chance to receive a free gift certificate, you must leave a comment on this post. The more blogs you visit and comment on, the more chances you have to win! Our blog hop runs from August 19, 2016, 12:00 A.M. ET through August 21, 2016, 11:59 P.M. ET. Each participating blog in this hop will award one lucky commenter a gift certificate. One Grand Prize certificate will be awarded based on all comments from all blogs. Winners will be posted on August 22, 2016 so be sure to check back because you may be the lucky winner!{This contest has ended}- Also, if you would like a free SVG file of the Tea Cup that I created, please fill in the contact form below and add a comment requesting the Tea Cup.
Please visit all of the blogs listed here and leave a comment for a chance to win at each blog.
JAN: http://izbzee.typepad.com/izbzee/2016/08/sizzixeclips-blog-hop.html
DEB: http://debscraftyside.blogspot.com/2016/08/sizzix-eclips-blog-hop.html
CAMILLE: http://shortonideasaz.blogspot.com/2016/08/sizzixeclips-august-blog-hop.html
MARIA: http://craftnkc.blogspot.com/2016/08/sizzixeclips-august-blog-hop-okay-im.html
Good luck and don’t forget to leave a comment AND fill in the contact form if you would like the free tea cup SVG file.
Congratulations to Beverly White for winning the Sizzix eClips blog hop prize from my website. Thank you to everyone who left a comment or requested my Tea Cup svg file. I am still giving away the Tea Cup svg file so please fill out the form and I’ll be happy to send you the file. Thank you to everyone who participated.
Thanks!
Thrilled to be Featured at:
This is Linked to:
A Delightsome Life, Artsy Fartsy Mama, Blogghetti, Chic on a Shoestring, Craft Dictator, Craft-o-Maniac, Crafts a la Mode, Create With Joy, Cupcakes and Crinoline, Dear Creatives, Denise Designed, DIY Crush, DIY Showoff, Flamingo Toes, Food Crafts and Family, Ginger Snap Crafts, Homework, Intelligent Domestications, Katherine’s Corner, Keeping it Simple, Life on Lakeshore Drive, Live Randomly Simple, Lou Lou Girls, Mad in Crafts, My Uncommon Slice of Suburbia, Our Daily Craft, Pieced Pastimes, Recreated Designs, Sarah Celebrates, Scrapality, Sew Can Do, Sew Can She, Tatertots and Jello, The Answer is Chocolate, The DIY Dreamer, The Girl Creative, Twenty Something in the 2010s, VMG206 and WonderMom Wannabe






Leave a comment